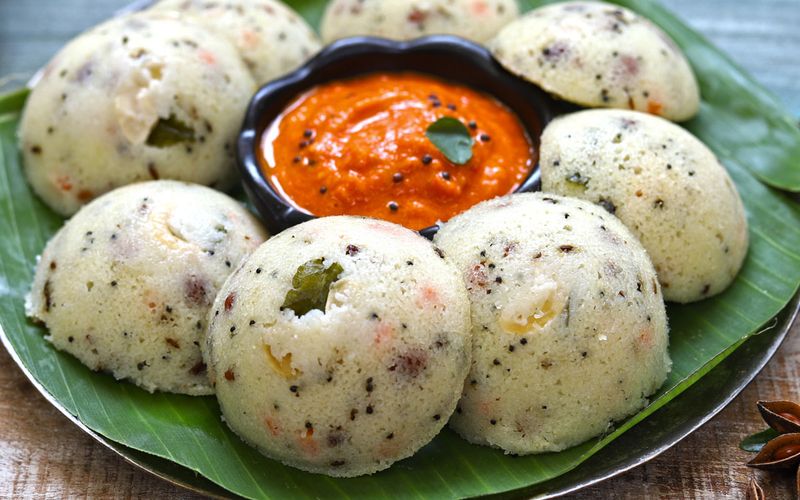
Idli Recipe: How to Make Soft & Fluffy Idli

Learn how to make soft and fluffy idli at home with rice, urad dal, poha, and simple ingredients. This recipe includes easy idli batter, fermentation, and steaming steps.
Prep time
20 minutes (plus 4 to 6 hours soaking and 6 to 14 hours fermentation)
Cook time
12 minutes (steaming per batch)
Cuisine
Indian (South Indian)
Ingredients
Nutrition
A reliable idli recipe depends on two variables above everything else: the correct ratio of idli rice to urad dal in the batter, and giving the fermented batter adequate time to rise before steaming. Get both right and the idlis come out soft, light, and fluffy regardless of equipment or experience level. Get either wrong and no amount of steaming adjustment fixes the result. This guide covers the ratio, the soaking and grinding process, fermentation in detail since it is consistently the most underexplained step, the steaming technique, and the specific troubleshooting fixes for the most common failure mode: idlis that come out dense and flat.
The Two-Ingredient Ratio That Determines Everything
The starting point of any soft idli recipe is the rice-to-urad dal ratio, and the standard that works consistently across different rice varieties and grinding equipment is 3 parts idli rice to 1 part urad dal by volume. Too much urad dal relative to rice produces idlis that are dense, slightly gummy, and faintly bitter. Too little urad dal and the idlis lack the structure to hold together and come out crumbly and coarse. A small addition of fenugreek seeds (methi), about half a teaspoon per cup of urad dal, rounds out the three core ingredients: the fenugreek aids fermentation activity, adds a slight bitterness that balances the bland rice base, and contributes to the characteristic aroma of a traditionally fermented South Indian breakfast staple.
Idli Batter Recipe: Soaking the Ingredients
Soaking determines how cleanly the grinder works and how evenly the batter ferments. This is the idli batter recipe step most home cooks rush, and the consequences show up in the final texture.
How Long to Soak
Idli rice needs 4 to 6 hours of soaking in cold water. Urad dal also needs 4 to 6 hours and is most reliably soaked separately from the rice to allow independent control over soaking time and to prevent the lentil's starch from absorbing into the rice water. Add the fenugreek seeds to the urad dal water rather than the rice water, since they release their compounds most effectively when soaked with the dal. Change the water once midway through soaking if possible, particularly for the urad dal, since fresh water produces a cleaner-tasting batter.
Why Poha Makes a Difference
The idli recipe with poha approach adds a small quantity of flattened rice (poha) to the idli rice during the soaking period: about 3 to 4 tablespoons per 2 cups (400g) of rice. Poha increases the starch content of the rice component slightly and introduces a softer, more absorbent texture into the ground paste, both of which translate to lighter, more tender idlis after steaming. It is an optional addition but one that experienced South Indian cooks consistently use, particularly in regions where the available idli rice is not the traditional parboiled variety.
How to Make Idli Batter: Grinding Correctly
The grinding step determines the batter's texture and aeration, both of which directly affect the final idli. A wet grinder with a stone attachment produces the best result by aerating the urad dal thoroughly during the extended grinding process. A high-powered blender works as a functional alternative when a wet grinder is unavailable, though it requires more attention to avoid overheating. This is the idli batter recipe for soft idli technique step that separates a light, airy result from a dense one.
Grinding the Urad Dal First
Drain the soaked urad dal and fenugreek seeds and grind them first, before touching the rice. Add cold water gradually (ice-cold water is ideal) while grinding, stopping to scrape the sides of the grinder frequently. The urad dal paste should become white, fluffy, and significantly increased in volume after 15 to 20 minutes in a wet grinder or 5 to 7 minutes in a high-powered blender. This aeration is what traps gas during fermentation and produces the light, honeycomb-like interior of a well-made idli.
Grinding the Rice to the Right Texture
Drain the soaked idli rice and poha and grind separately until the paste reaches a slightly coarse, grainy consistency rather than a completely smooth one. The slight texture in the ground rice component produces a better idli structure after steaming than a fully pureed paste, which can make the idli gummy rather than soft. This step answers the how to make idli question at its most foundational level.
Combining and Consistency
Transfer both pastes into a large, deep container (the batter will roughly double during fermentation and needs room to expand). Fold gently until combined. The mixed batter should be thick enough to coat the back of a spoon heavily but still pour slowly from a ladle. Add salt at this stage: approximately 1 teaspoon per 3 cups (600g) of dry rice used. Salt added before fermentation contributes to the process rather than inhibiting it and distributes more evenly through the batter than salt added after.
Fermentation: The Most Consequential Step in the Idli Recipe
Fermentation is where most failed batches are determined, often hours before the idlis go near a steamer. An under-fermented traditional idli recipe batter produces dense, flat idlis regardless of how carefully the steaming is managed. According to USDA FoodData Central, fermentation of rice and lentil batters increases the bioavailability of certain nutrients including B vitamins and minerals, making a properly fermented South Indian idli recipe batter more nutritionally beneficial than an unfermented one.
Creating the Right Fermentation Environment
The batter needs warmth, darkness, and no drafts to ferment reliably. In a warm kitchen above 28°C (82°F), fermentation completes in 6 to 8 hours. In cooler climates or during winter months, it may take 10 to 14 hours or more. Three reliable indoor methods: place the batter in an oven with only the interior light switched on (no heat), place it in a microwave with a cup of hot water beside it (the steam creates warmth without cooking the batter), or wrap the container in a thick cloth and place it in the warmest corner of the kitchen.
Signs the Batter Has Fermented Correctly
A fully fermented batter should roughly double in volume, have a mildly sour, yogurt-like smell rather than a sharp or unpleasant odor, and show visible bubbles throughout the surface and interior when a spoon is dipped in. The surface should look slightly domed rather than flat. Under-fermented batter looks the same as when it went in: flat surface, no bubbles, no volume increase, and no sour aroma. Time alone is not a reliable indicator; the visual and olfactory cues are the correct guide.
Idli Recipe with Rice and Urad Dal: Steaming Correctly
With a fully fermented rice and lentil batter ready, the steaming step is straightforward as long as three specific details are handled correctly. This section directly covers idli recipe with rice and urad dal, how to make soft idli, and how to make fluffy idli technique.
Greasing and Filling the Idli Moulds
Lightly oil each cavity of the idli mould with a neutral-flavored oil or ghee before filling. Fill each cavity to about three-quarters full, not to the top. A fully filled mould produces an idli that overflows its edges and presses against the plate above it during steaming, creating a dense, misshapen result. The three-quarter level allows the batter to rise freely during steaming, producing a properly rounded, domed idli.
Steaming Time and Doneness Test
Bring the water in the idli steamer to a full boil before placing the filled mould inside. Steam on medium-high heat for 10 to 12 minutes for standard-size idlis. The toothpick test confirms doneness: insert a toothpick or thin skewer into the thickest part of an idli and withdraw it cleanly. It should come out without wet batter clinging to it. If batter transfers to the toothpick, continue steaming for 2 more minutes and test again.
Resting Before Unmoulding
Remove the steamer from heat and allow the idlis to rest inside for 2 to 3 minutes before attempting to unmould. Hot idlis are fragile and tend to stick to the mould surface, tearing when pulled out immediately. After a brief rest, run a wet spoon or spatula around the edge of each cavity and lift gently. A properly rested idli releases cleanly and holds its domed shape.
Idli Rice vs. Alternatives at a Glance
Idli rice (parboiled rice) is the correct ingredient for the most authentic, soft result, but the following alternatives work with adjustments.
| Rice Type | Result | Fermentation | Best For |
|---|---|---|---|
| Idli rice (parboiled) | Softest, most authentic | Ferments best | Traditional idli recipe |
| Regular raw rice | Slightly coarser texture | Ferments well | Acceptable substitute |
| Sona Masoori rice | Good texture, common substitute | Ferments well | Easy availability |
| Brown rice | Denser, less soft | Ferments slower | Healthier variation |
| Ready idli mix | Convenient, less flavor | No fermentation needed | Quick weekday option |
Easy Idli Recipe at Home: Tips for Soft and Fluffy Results
Use ice-cold water when grinding the urad dal to prevent the friction from heating the batter and destroying the aeration built up during grinding. Add salt before fermentation rather than after. Never stir the fermented batter vigorously before steaming: a single gentle fold is enough to incorporate any settled liquid without deflating the air bubbles that produce the light texture. Always steam on medium-high heat rather than high heat, since excessive steam pressure creates a tough outer skin on the idli rather than an even, soft interior. These principles form the practical foundation of any easy idli recipe that produces a consistently reliable result at home. For a broader South Indian-inspired breakfast spread, the high protein Indian breakfast guide covers how idli fits alongside other protein-balanced morning options.
Troubleshooting: Why Idlis Come Out Dense or Flat
Under-fermented batter is the cause of dense idlis in the majority of failed batches. If the batter did not double and does not smell mildly sour, it is not ready regardless of how many hours have passed. Old or inactive urad dal that has been stored too long loses its ability to ferment effectively and should be replaced. Grinding the rice component too fine produces a gummy, heavy idli rather than a soft one. Overfilling the mould cavities prevents the idli from rising freely and produces a flat, compressed result. Steaming at too-high heat toughens the outer surface before the interior sets properly. Any homemade idli recipe batch that produces a poor result will trace to one of these five causes.
What to Serve With Idli: The Classic Accompaniments
Idli is intentionally mild, designed as a vehicle for its accompaniments rather than as a standalone flavored item. Coconut chutney is the most standard pairing: fresh grated coconut blended with green chili, ginger, and a tempering of mustard seeds and curry leaves. Idli sambar, a thin lentil-based vegetable stew seasoned with tamarind and sambar powder, provides both a protein accompaniment and a dipping liquid for the idli. Tomato chutney and peanut chutney are common alternatives for households that prefer a no-coconut option. For a tangy condiment alternative to coconut chutney, the mango chutney recipe provides a sweet-sour option that pairs well with the mild flavor of idli, and a sprouts salad makes a nutritious no-cook accompaniment alongside for a more substantial breakfast spread.
FAQ
What is the ratio of rice to urad dal for idli?
The standard ratio is 3 parts idli rice to 1 part urad dal by volume, which produces soft, well-structured idlis with good fermentation. Some cooks use a 4:1 ratio for a lighter result. Using too much urad dal produces dense, slightly bitter idlis; too little produces coarse, crumbly ones.
Why are my idlis not soft?
Dense idlis almost always result from under-fermented batter. The batter needs to roughly double in volume and develop a mildly sour smell before steaming. Other causes include grinding the urad dal without enough aeration, using old or inactive urad dal, or steaming at too-high a heat which toughens the outer layer.
How long should idli batter ferment?
In a warm kitchen above 28°C (82°F), idli batter typically ferments in 6 to 8 hours. In cooler climates or during winter, fermentation can take 10 to 14 hours or more. The correct indicator is volume and aroma rather than time alone: the batter should double in size and smell pleasantly sour.
Can idli batter be made without a wet grinder?
Yes. A high-powered blender produces acceptable idli batter. The key difference is that a wet grinder aerates the urad dal more thoroughly during grinding, producing a fluffier batter. When using a blender, grind in short pulses with cold water and avoid overheating the motor to get the best possible aeration.
How long does idli batter last in the fridge?
Properly fermented idli batter keeps in the refrigerator for 4 to 5 days in an airtight container. The batter continues fermenting slowly in the cold, becoming progressively more sour. It is best used within the first 2 to 3 days for the mildest, softest result.
The two variables that matter most in any idli recipe are the rice-to-dal ratio and giving the fermented batter enough time to rise fully. An under-fermented batter will not produce soft idlis regardless of steaming technique, and the correct ratio cannot be compensated for by either grinding method or soaking duration. Get both right and the steaming step becomes the straightforward finish it should be rather than the problem-solving stage it becomes when the batter is wrong. Browse more vegetarian recipes for South Indian-inspired meal ideas to build around this recipe.
Tags